

Walking down the aisles in our local supermarket, we’ve all been attracted to cosmetics and toiletries wrapped in shiny packets. But is all that glitters always gold? Maybe not. So even though we’ve been guilty of spending extra bucks on soaps and shampoos, deep down we know that these products come packed with chemicals that are not always good for our skin. What’s actually good is taking out some time from our busy schedules and investing it in DIY products of daily care.Yes, we’re here to show you how to make your own organic homemade soap that will make you glow naturally. Whether it is skin purifying, hydrating or just cleansing, we’ve got 5 recipes for homemade soap that you will love. And there’s homemade soap recipe for vegans too! Read more to find out.
Soaps, for example, usually tend to make our skin dry and we end up resorting to fancy face wash tubes. While the latter isn’t bad, they are expensive. What if we tell you that you can get amazing moisturization for your skin, from soaps, and with half the money you spend on your face wash?

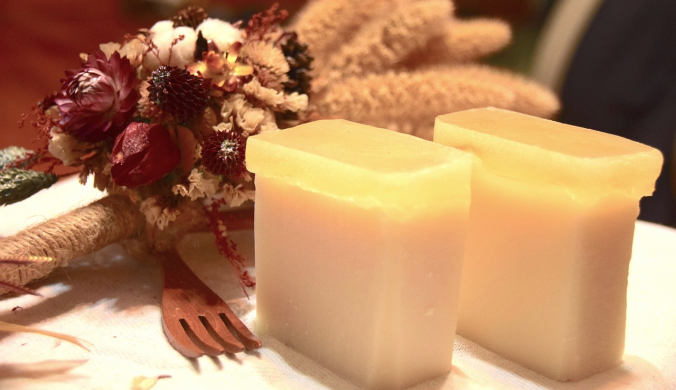
1. Lavender and Mint Homemade Soap
Lavender and Mint’s simple yet very effective aroma is one that can appeal to a wide range of people. For example, lavender is exceptionally soothing, inhibits fungal growth and even speeds the healing of minor wounds. On the other hand, Peppermint reduces itchiness and reinvigorates dull or tired skin, giving the youthful glow back to you. The dried mint leaves will help exfoliate, eliminating the dried, dead cells from your skin. They also give an interesting look to this soap, which would otherwise be a boring, beige soap that would not demand the attention of any.
Recipe:
Ingredients needed
Oils and Butters
315g Coconut Oil
360g Olive Oil
135g Avocado Oil
45g Castor Oil
45g Cocoa Butter
Lye Solution
258g Distilled Water (boiled tap water or bottled drinking water is fine)
129g Sodium Hydroxide/Lye Crystals
Essential Oils and Botanicals
33g Lavender Essential Oil
10g Peppermint Essential Oil
1 Tbsp Dried Crushed Mint
Equipment
Soap Mold
Safety Glasses
Protective Gloves
Process
- Start by weighing essential oils in a glass container. It makes it easier to add them later, as it can take some time to get these minute calculations correct. Weigh the distilled water in a glass jug. Weigh the crystals of sodium hydroxide / lye in a separate container.
- Combine these by adding into another bowl and mixing the lye crystals. This will result in a chemical reaction and the lye water will start to rise in temperature. Weigh and melt the cocoa butter and coconut oil. Weigh the olive, avocado and castor oils in the container holding the cocoa butter and cocoa oil.
- Check the oils ‘ temperature and compare it to the lye water’s temperature. The optimum temperature should be between 90-120F for both of them. You shouldn’t heat up the lye air, but if they’re too cold you can heat up the oils a little bit. Pour your lye solution into your oils and blend with a stick blender.
- Next, add essential oils and then mint. Once the essential oils are added, the mixture begins to thicken. Quickly pour the mixture into the mold. Leave the mold undisturbed for 24-48 hours and let saponification take place.
- Once the soap has been completely sapped, you should separate it from the mold and shape it into bars. Based on the desired thickness, you should be able to get around 10-12 bars from this batch.
- Leave them to cure for 4 weeks and check with a Ph marker strip to make sure they are safe to use.
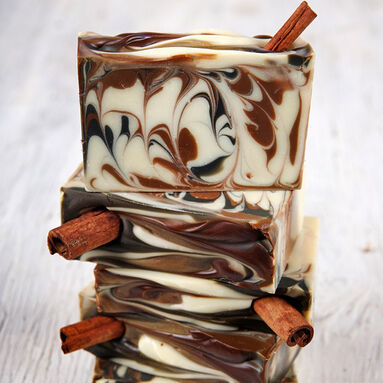
2. Cinnamon Cocoa Cold Process Homemade Soap
Vanilla fragrance oils turn soap and other products brown. Cinnamon Cocoa Fragrance Oil includes hints of coffee beans, sugar, and cocoa. Such delicious-smelling notes are born from a high content of vanilla, resulting in a very dark brown soap. Cinnamon Cocoa Cold Process Soap embraces it with a brown and black color palette. Imagine wafting gentle vacation flavors in the breeze from the oven and Christmas music. A luxurious Christmas soap made from a perfectly scented combination of essential oil and natural dyes. The swirly decoration on top is also incredibly easy to create. Such homemade soap can be great gifts for Christmas.
Recipe:
Ingredients needed
10″ Silicone Loaf Mold
Hanger Swirl Tool
5 oz. Babassu Oil (15.1%)
0.7 oz. Castor Oil (2.1%)
3.3 oz. Cocoa Butter (9.9%)
8.3 oz. Coconut Oil (25%)
1 oz. Mango Butter (3%)
3.3 oz. Oat Oil (9.9%)
6.6 oz. Olive Oil (19.9%)
5 oz. Sunflower Oil (15.1%)
4.8 oz. Sodium Hydroxide Lye
9.9 oz. Distilled Water (10% water discount)
1.3 oz. Cinnamon Cocoa Fragrance Oil
Black Oxide
Brown Oxide
Titanium Dioxide
Cinnamon Sticks
Process
- Disperse 2 titanium dioxide teaspoons into 2 tablespoons of light liquid oil like sunflower or sweet almond. Disperse black oxide 1/2 teaspoon into 1/2 tablespoon of thin liquid oil. Apply 1 teaspoon of brown oxide into 1 tablespoon of light oil. To get rid of clumps, use a mini mixer.
- In a glass fragrance oil-safe container, measure out 1.3 ounces of Cinnamon Cocoa Fragrance Oil and set aside.
- Make sure you have safe practices of handling the mixture. That means goggles, gloves, and long sleeves. Always soap in a well-ventilated area. Add 4.8 ounces of lye to 9.9 ounces of distilled water slowly and carefully. Stir slowly until the lye is completely dissolved. Set it to cool down.
- In a large mixing bowl, melt and add 5 ounces of babassu oil, 0.7 ounces of castor oil, 3.3 ounces of cocoa butter, 8.3 ounces of almond oil, 1 ounce of mango butter, 3.3 ounces of oat oil, 6.6 ounces of olive oil and 5 ounces of sunflower oil.
- Split off 200 mL of batter into one container and 300 mL of batter into another container. Add the following colorants to the three containers and whisk in. Container A (200 mL): 1/2 teaspoon dispersed black oxide. Container B (300 mL): 1 teaspoon dispersed brown oxide. Container C (remaining batter): All dispersed titanium dioxide. Add the fragrance oil proportionately to the black and brown soap. Use a whisk to thoroughly mix in the fragrance.
- Add in the mold a tiny amount of white soap – just enough to reach the rim. Alternate and add small quantities of red, green, and white soap into the mold at different heights.
- Insert one side of the mold with the Hanger Swirl Tool. Then, swirl the soap using loop-de-loop motions. There’s no way to do this right or wrong. Hanger Swirl Machine should be moved in circular motions. Some loops are supposed to be large and some small. Disable the Hanger Swirl Machine by bringing it up and out on one side of the mold after you have swirled the soap about 5-7 times.
- Pour black, white, and brown soap lines down the mold’s length. It will help to create contrast by placing the white soap in the center. To swirl the very top of the soap, insert a dowel or chopstick. Use a curve pattern “S” down the mold’s width. Be careful not to overturn the soap or muddle the colors. Place the cinnamon sticks at an angle on one side of the soap. Place any stick you want to be at the middle of the bar.
Once the mold pulls away from homemade soap without tearing, unmold it and cut into bars. Allow them to cure for 4-6 weeks.
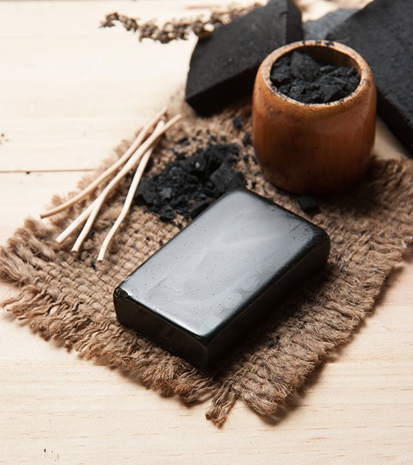
3. Activated Charcoal Homemade Soap
This fresh-smelling soap is made with activated charcoal to do just that, suck out any harmful chemicals that make our skin vulnerable to wrinkles, blackheads and other irritants that we don’t really like. While it has quite a dark color which leaves this soap looking a bit daunting, the charcoal can do wonders to reduce skin imperfections. It’s completely vegan-friendly and this is one of our favorite things about this! If you have plenty of vegetarian and vegan mates, then this is a good homemade soap to gift anyone who takes animal rights seriously.
Recipe:
Ingredients needed
Oils
135g Coconut Oil
31.5g Shea Butter
180g Olive Oil
67.5g Avocado Oil
36g Castor Oil
Lye solution
126g Distilled Water (boiled tap or bottled water is fine)
63g Lye/Sodium Hydroxide Crystals
Essential oils, Botanicals and Extras
10g Tea Tree
5g Rosemary
5g Lavender
2.5g Peppermint
1 tablespoon Activated Charcoal
Process
- Begin by measuring and mixing essential oils in a glass container. Since it may take some time to get these proportions right, it is better to do it now, so when it matters, you just need to tip it in later.
- Weigh these in separate containers- sodium hydroxide / lye crystals and water. Using a cold glass tub if possible. When ready, pour the crystals into the water and stir with a spoon of stainless steel. This starts the chemical reaction, and the temperature of the lye water increases rapidly. Now, put the jug aside to cool, preferably somewhere with good ventilation and move on.
- The coconut oil and shea butter are weighed. Then, melt them together. Although a sequence of 30-second microwave bursts fits well, you can use a water bath.
- Weigh the olive, avocado and castor oils and add them to the molten coconut oil and shea butter.
- Now that it’s time to blend, test and compare the temperature of the oils and the lye liquid. We need them from 90F to 120F.
- Once you’re confident that both come within this scope, pour the lye water into the oils and combine with a stick blender before you hit trace.
- Go ahead and add the activated charcoal and essential oils (in that order), stirring thoroughly after. Once the last ingredients have been added, the batter will start to harden. So, working quickly but carefully (as the batter is still caustic), pour or spoon your batter into your soap moulds.
- Permit this to saponify before extracting from the mould for 24-48 hours. If after the first 48 hours the soap is still spongy, leave it for another 24 hours before you try to remove it. Instead, try adding sodium lactate if you come back to make it.
- It’s important to keep it cool while it saponifies. Use a medium to low setting heating pad for a couple of hours, but if you don’t have one, keep it well insulated with a piece of cardboard on top and an old towel you don’t use anymore.
- Now that you’ve got it out of the mold, in a cool and dry setting, we’ll have to let it cure for about 4 weeks.
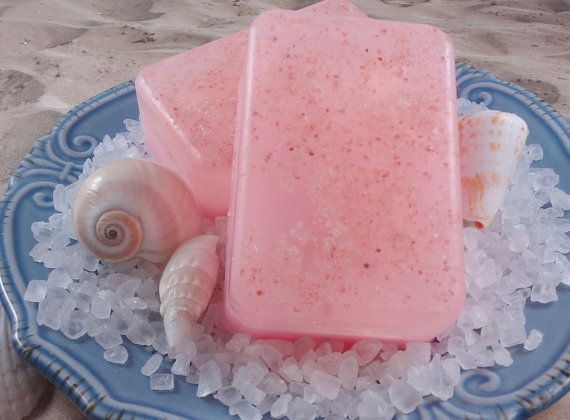
4. Sea Salt Homemade Soap
Adding salt to your handmade soap is a fun and easy way to incorporate the various benefits of sea salt into your daily routine. Salt is an inexpensive ingredient that transforms a normal soap bar into a luxury sea salt soap bar that exfoliates the body softly and softens it. Salt from the Dead Sea and epsom salt are not recommended. Salt from the Dead Sea has a very low mineral content and salt from epsom has high magnesium content. Both are going to draw moisture to create a sticky soap. However, Sea salt and Pink Himalayan salt are both great choices. A matter of personal preference is the size of the salt grain. The warm water dissolves the salt as you wash off your face or body, so it is not rough or sharp on your skin.
Recipe:
Ingredients needed
11 oz coconut oil
3 oz olive oil
1 oz castor oil
1 oz mango butter
8 oz Himalayan sea salt (or natural salt of choice)
6 oz distilled water
2.3 oz lye
0.5 oz lavender essential oil (optional)
Process
- Get your mold ready. Then you will need to cover the mold with wax paper if you’re using a wood mold.
- Place the canned glass jar on the scale and tare the scale. Pour distilled water into the jar till it reads 6 oz. Set aside. Put on the second container and tare the scale.
- Wear your protective gear (gloves and eyewear) and pour lye into the container gently until the meter reads 2.3 oz. Take out both the jars and the spoon.
- Still wearing the protective gear, pour the lye into the water slowly. Remove the mixture. It will get very warm so if you need to transfer it, keep this in mind. Let the mixture sit and cool down to about 100 degrees.
- While the lye is cooling, weigh the essential oils out of all other oils and steam them in your pot or slow-cooker together. Remove the oils from the heat once they are melted and let them cool up to 100 degrees. You can either use a candy thermometer or an infrared thermometer to measure the temperature of each container.
- Ideally, you want both the lye water and the oils to be about 100 degrees and 10 degrees from each other. Slowly pour the lye / water into the oils when the temperature matches. Use the immersion blender to get a small residue of the batter. To add the essential oils, it should be slightly thick and resemble cake batter. Pulse the immersion blender a few times to thoroughly mix the oils.
- Stir with salt. Keep stirring until distributed evenly. In your set mold, spoon the soap batter. Remember that the soap is not fully “cooked” yet at this point and could still irritate your skin so you should still be wearing your gear.
- If you are using a silicone mold, then you soap should be ready in 24 hours. Let it rest and un-mold the soap for 24 hours.
- If you are using a log style mold, keep an eye on your soap and as soon as it is set (after approximately an hour) un-mold it and cut it into bars. If you wait too long it will become too hard to cut.
- Spread out the bars with an inch or so of space between them in a dry area to allow air circulation and let them sit for 4-6 weeks. This will allow the soap to complete the process of saponification and also to dry them out a little so that they will last longer in the shower.
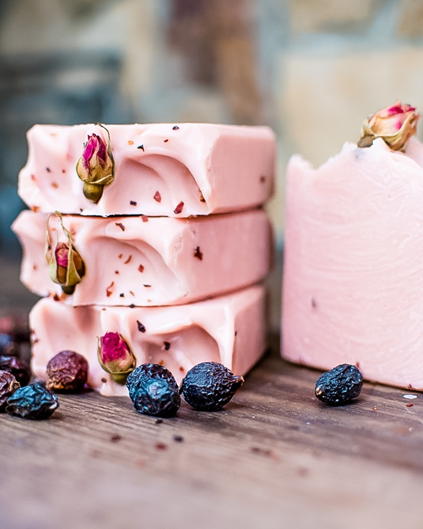
5. Old-Fashioned Rose Homemade Soap
This exquisite soap features natural flowers, smooth shea butter and organic seed oil from rosehip. Rose petal-infused olive oil softens and conditions skin, while coconut oil adds plenty of bubbles and creates a tougher bar of soap. Shea butter is not only great for your skin, but adds additional hardness to the bar. For its fantastic skin-regenerating and healing properties, rosehip seed oil has been incorporated in this soap. Rose kaolin clay contributes a natural pink color, but for a pale pink shade you can use half as much or leave it out for a creamy white bar.
Recipe:
Ingredients needed
1 handful fresh or dried rose petals
10 oz (283 g) water
4.14 oz (117 g) sodium hydroxide (lye)
15 oz (425 g) rose petal-infused olive oil
1 oz (28 g) rosehip seed oil
8 oz (227 g) coconut oil
4 oz (113 g) shea butter
2 oz (57 g) castor oil
2 tsp rose kaolin clay (optional, for color)
1 tbsp (15 ml) water
1 to 2 tbsp (15 to 30 ml) rose absolute or geranium essential oil (optional)
Process
- This is a quick method to make oil infused with rose petals. Fill a glass canning jar with dried rose petals about one-fourth to one-half the way. First, load the container with olive oil almost to the top. Set the uncovered jar down into a saucepan containing a few centimeters of water, forming a double-boiler of a kind of adjustment.
- Place the pan for about two hours over a low burner and heat. Keep an eye on things while doing this to prevent all the water from evaporating. Keep the water simmering low, not boiling. Try to keep the temperature around or below 115F (46C) so that you don’t cook your rose petals accidentally. Remove the jar from the pan after two hours have passed and allow it to cool.
- Use a fine mesh strainer and/or a cheesecloth sheet to strain it and measure the amount you need for the recipe. The remainder can be kept for about a year in a jar in a warm, dark place.
- For making Rose-infused Water, place the rose petals in a container or jar that is heatproof. Heat the water and pour over the petals. Enable the infusion of rose to steep until it is cooler or room temperature. Make sure the tea is fairly light, not a dark brown shade, or it can influence the finished soap quality. Strain the rose-infused water into a plastic bowl or pitcher that is heavy-duty or stainless steel.
- For making the soap, wear boots, glasses and long sleeves, pour the lye into the petal infusion of the cooled rose and swirl slowly until it is completely dissolved. It may change a dark brown color as it reaches the lye, but that’s all right at this point. Set aside the lye solution for 45 minutes to 1 hour or until it cools down to around 100 to 110 ° F (38 to 43 ° C).
- When cooling the lye solution, weigh the seed oil of olive, castor and rosehip and put it in your bowl or container. Steam the coconut oil and shea butter in a double boiler until it is molten. Add the olive oil and castor oil to the tank. This should bring the temperature to about 90-100 ° F (32-38 ° C).
- Stir the rose kaolin clay, 1 tablespoon (15 ml) of water and essential oil together in a small bowl until smooth. This will be added either at trace (for cold process soap) or after cooking time (for hot process soap).
- Hand stir for about 30 seconds with an immersion blender (powered off), then turn on the immersion blender and mix the soap batter, alternating with hand stirring every 30 seconds or so to prevent the engine of the immersion blender from burning out. Continue to mix until you reach trace (trace means that the soap batter is thick enough to leave a faint, fleeting imprint when it’s drizzled across itself). Within a few minutes, this recipe will reach trace.
- Stir the clay, water and essential oil mixture into the soap thoroughly for Cold Process Soap. Pour the soap batter into a prepared soap mold, cover it with a wax paper sheet and then cover the lid of the mold or use a piece of cardboard to do so. To help keep the moisture in, tuck a towel or quilt around the mold. Let the soap sit in the mold for 24 to 48 hours, then cut and break into pieces. Allow the bars to cure in the open air for at least four weeks before using.
- Pour the soap batter in a slow cooker turned on low heat for Hot Process Soap. Cover with the lid and allow it to cook every 15 minutes for 1 hour, testing and stirring. Stir in the clay, water and essential oil mixture after the hour has passed, then spoon the cooked soap into a mold. Enable it to firm up overnight, then cut and slice into bars.
Once you try out these organic homemade soap recipes, you’ll be bidding farewell not just to dry skin but also pimples, acne and stubborn marks that prevent you from looking your best. Not only are these soaps great for personal use, but also serve as thoughtful gifts that your friends and family will totally love. We’re sure they’ll come back to you asking for more!
So put your thinking hats and gloves on and use your favourite essentials oils or fragrances to further customize the mentioned recipes according to you. Or you could just follow the classic organic homemade soap recipes. Either way, we guarantee you’ll have fun making your own organic soaps.
More to read:
6 Home Decor Items to Modify the Interiors of Your House 2021
Best Hand Blender in the U.S. That You Must Check Out 2021 Acekool Hand Blender BH1